
Summary
Ubuntu LTS (Long-Term Support) is a robust and reliable operating system that serves as an excellent foundation for desktop computing. It does not matter if you are an expert Linux user or a novice, this step-by-step guide will help you understand the Ubuntu LTS Desktop installation process, assuring a hassle-free and effective setup.
Features of Ubuntu LTS Desktop
Ubuntu LTS (Long-Term Support) Desktop stands out as a premier choice for users seeking a stable and reliable operating system. Packed with a plethora of features, this edition of Ubuntu is designed to enhance user experience, security, and overall system performance. Let’s apprehend the vital features that make Ubuntu LTS Desktop a compelling option for desktop computing.
1. Long-Term Support (LTS) Stability:
At the core of Ubuntu LTS Desktop is its commitment to providing an extended support lifecycle. With five years of support for each LTS release, users can enjoy a stable and reliable environment, free from the need for frequent upgrades.
2. GNOME Desktop Environment:
Ubuntu LTS Desktop utilizes the GNOME desktop environment, offering a clean and intuitive interface. GNOME provides a seamless and human-friendly experience, with an emphasis on simplicity as well as efficiency. Users can easily customize the desktop to suit their preferences.
3. Software Center for Effortless App Installation:
The Ubuntu Software Center simplifies the installation of applications. With an extensive library of software, users can easily discover, install, and manage applications, ensuring a smooth and hassle-free experience.
4. Snap Packages for Enhanced Security:
Snap packages, a universal packaging format, are integral to Ubuntu LTS Desktop. These packages offer enhanced security by isolating applications and their dependencies. Users benefit from the latest features and updates while maintaining system stability.
5. Comprehensive Software Ecosystem:
Ubuntu LTS Desktop comes pre-loaded with a comprehensive set of software, including LibreOffice for productivity, Firefox for web browsing, and a range of multimedia tools. This ensures that users have essential applications readily available right after installation.
6. System Updates and Upgrades:
The Ubuntu Update Manager streamlines the process of keeping the system up-to-date. Users receive timely notifications about available updates, ensuring that their system remains secure and benefits from the latest features and improvements.
7. Full Disk Encryption Options:
Security is a top priority in Ubuntu LTS Desktop, and users have the option to enable full disk encryption during installation. This feature safeguards data from unauthorized access, providing an extra level of security.
8. GNOME Tweaks for Customization:
For users who enjoy tailoring their desktop environment, Ubuntu LTS Desktop includes GNOME Tweaks. This tool allows users to customize several aspects of the desktop, including themes, icons, and extensions, providing a personalized user experience.
9. Accessibility Features:
Ubuntu LTS Desktop is committed to accessibility. It includes a range of features such as screen readers, magnifiers, and keyboard shortcuts, making the system accessible to users with diverse needs.
Ubuntu LTS Desktop Installation Steps to Follow (9 Steps)
Let’s break down the installation process into nine clear steps, ensuring a smooth and successful setup of your Ubuntu LTS Desktop environment.
Step 1: Preparing Your System
Before diving into the installation, ensure you have the essentials:
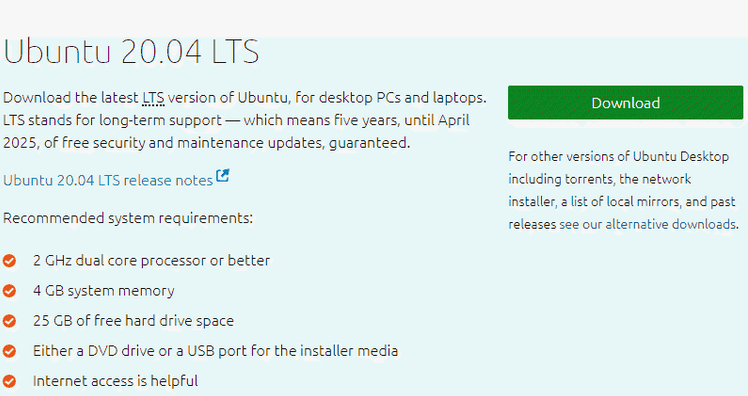
A bootable USB drive with the Ubuntu LTS Desktop ISO.
A computer meeting Ubuntu’s hardware requirements.
Back up critical data to prevent any potential loss.
Start by confirming that your computer fulfills the minimal hardware necessities for Ubuntu LTS Desktop. This information is crucial to ensure a smooth installation and optimal performance once the system is up and running. Additionally, take the time to organize and back up important data to safeguard against any unexpected issues during the installation process.
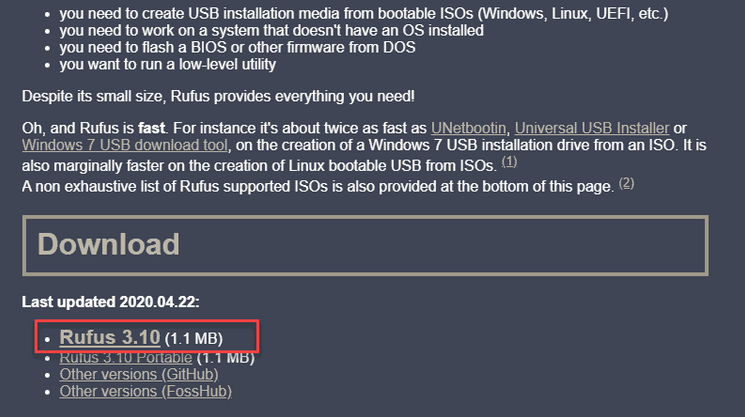
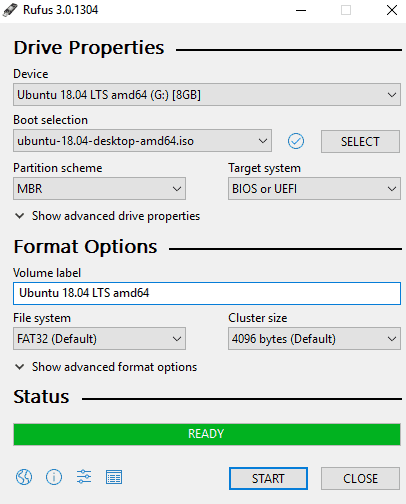
Step 2: Creating a Bootable USB Drive
Employ tools such as Rufus or UNetbootin to construct a bootable USB drive with the Ubuntu LTS Desktop ISO. This step is critical for starting the installation method.
Creating a bootable USB drive involves selecting the appropriate tool based on your operating system and following a straightforward process. Rufus, for instance, is a user-friendly application that guides you through the steps, ensuring the USB drive is properly configured for installation. Be patient during this phase, as the accuracy of the bootable USB drive is pivotal to the overall success of the installation.
Step 3: BIOS Settings Configuration
Insert the bootable USB drive and access your system’s BIOS settings. Place the boot order to prioritize the USB drive, allowing your system to boot from the installation media.
Accessibility to the BIOS settings may vary according to the manufacturer of a computer, so consult your device’s manual for specific instructions. Once in the BIOS, navigate to the boot order settings and ensure that the USB drive is set as the fundamental boot device. This crucial step ensures that your system boots from the Ubuntu LTS Desktop installation media, initiating the installation process seamlessly.
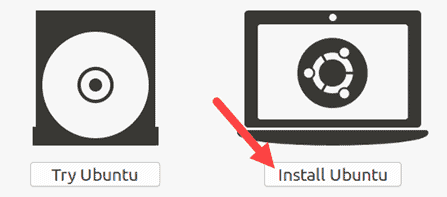
Step 4: Launching the Installation Process
Boot your computer from the USB drive and click on the “Install Ubuntu” icon on the desktop. This initiates the Ubuntu LTS Desktop installation process.
As the Ubuntu LTS Desktop environment loads from the USB drive, take a moment to familiarize yourself with the desktop interface. The “Install Ubuntu” icon serves as your gateway to a well-guided installation process. Click on it to commence the installation wizard, which will guide you through the essential configuration steps, ensuring a successful and tailored installation on your system.
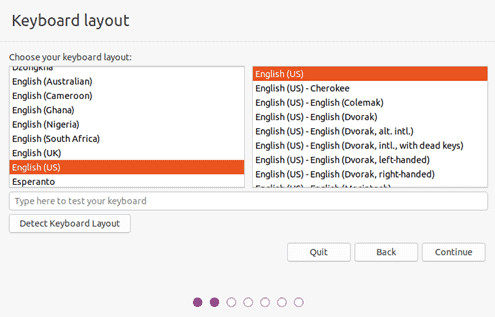
Step 5: Language and Keyboard Configuration
Select your desired language & keyboard layout. Ensuring accurate language settings from the start is vital for a high-level user experience.
Choosing the right language and keyboard layout is more than a formality; it sets the foundation for a user-friendly experience. Assure that the language reflects your desired language for system prompts and menus. Similarly, select the appropriate keyboard layout to avoid issues with typing and shortcuts during and after the installation. This attention to detail ensures that your Ubuntu LTS Desktop environment aligns with your language preferences right from the start.
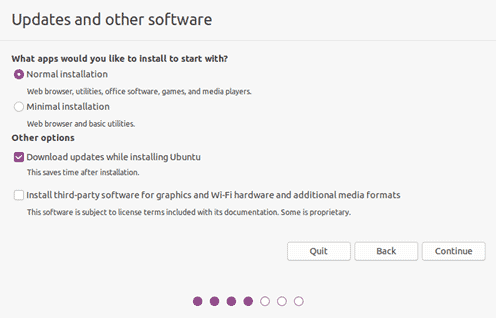
Step 6: Choosing Installation Type
Opt for either “Normal Installation” or “Minimal Installation” based on your preferences. The latter provides a more customizable installation by including only essential software packages.
This step invites you to tailor the installation based on your specific needs. The “Normal Installation” option provides a standard set of applications, while the “Minimal Installation” option empowers you to choose additional packages according to your preferences. Consider your computing requirements and select the option that matches with your needed level of customization. This choice sets the tone for the software environment you’ll interact with on your Ubuntu LTS Desktop.
Step 7: Partitioning Your Drive
Choose between automatic and manual partitioning options based on your expertise. For beginners, automatic partitioning simplifies the process, while advanced users can opt for manual customization.
Partitioning your drive is a critical step in the installation process, influencing the organization and allocation of storage space on your system. Automatic partitioning is recommended for those less familiar with disk management, as it allows the system to make optimal decisions based on available space and requirements. Alternatively, advanced users can opt for manual partitioning to exert greater control over how their storage is allocated, catering to specific preferences or dual-boot setups.
Step 8: User Account Setup
Create a user account by providing your name, username, and a secure password. Optionally, encrypt your home directory for an added layer of security.
Establishing a user account is a pivotal step in personalizing your Ubuntu LTS Desktop experience. Take the time to choose a username and password that align with your security preferences. The option to encrypt your home directory enhances data security, providing an additional layer of protection for your files. This step ensures that your Ubuntu LTS Desktop environment is tailored to your computing needs and prioritizes your user data’s security.
Step 9: Finalizing the Installation
Sit back as Ubuntu LTS Desktop installs on your system. Once complete, eliminate the installation media, press “Enter” to reboot, and log in with the credentials you placed in the installation process.
As the installation progresses, the system will configure diverse elements to guarantee an effective user experience. Be patient during this phase, as the time required for installation may vary based on your system specifications. Once complete, follow on-screen prompts to eliminate the installation media and initiate the system reboot. Upon restarting, log in using the credentials you established earlier. Your Ubuntu LTS Desktop is now installed and ready for exploration and customization.
Final Words
Congratulations on successfully installing Ubuntu LTS Desktop! You’ve just set up a powerful operating system that’s stable, secure, and ready for all your needs. The steps we covered act like a guide, making sure you smoothly transition into the world of Ubuntu.
Choosing Ubuntu LTS Desktop is more than just installing software. It’s like joining a big group of people who love working together on cool computer stuff. This operating system lets you explore lots of things, change how your desktop looks, and try out new ideas.
So, as you finish up with this guide, think of it as the beginning of your adventure with Ubuntu LTS Desktop. It’s not just a computer system; it’s a friendly space where you can do things your way. Now that it’s all setup, you’re part of a worldwide community that likes freedom, working together, and coming up with new and cool things. Enjoy your time with Ubuntu, and have a great time using your computer! Happy computing!


