
Introduction
Are you seeking to take up the strength of Ubuntu within your Windows environment? With Hyper-V, Microsoft’s virtualization platform, you can seamlessly run Ubuntu alongside your Windows operating system. In this guide, we’ll walk you through the steps to install Ubuntu on Hyper-V, allowing you to enjoy the versatility of both platforms without the need for separate physical machines.
Hyper-V System Requirements

Before diving into the installation method, it is vital to guarantee that your system fulfills the necessary necessities for operating Hyper-V. You’ll need a Windows 10 Pro, Enterprise, or Education edition, along with a 64-bit processor with Second Level Address Translation (SLAT) capabilities and at least 4GB of RAM. Additionally, virtualization must be enabled in the BIOS settings of your system.
Hyper-V Ubuntu Installation Guide

STEP 1: Permit Virtualization in BIOS
Before digging into the appealing arena of operating Ubuntu on Hyper-V, you are required to ensure that your system is ready for virtualization. This involves accessing your system’s BIOS settings and enabling virtualization support, also known as “hardware-assisted virtualization.” This crucial step allows your processor to efficiently handle the demands of virtualization, ensuring smooth performance when running multiple operating systems simultaneously.
To begin, restart your computer & access the BIOS settings by clicking the designated key during startup, often indicated on the screen. As soon as in the BIOS menu, navigate to the section related to processor or performance settings. Here, you’ll typically find options such as “Virtualization Technology,” “Intel VT-x,” or “AMD-V,” depending on your processor manufacturer.
Locate the appropriate setting and guarantee that it is permitted. This step may vary depending on your BIOS version and motherboard manufacturer, so consult your system’s documentation if you’re unsure. Once enabled, save your modifications and exit the menu of BIOS, allowing your system to reboot.
By enabling virtualization in your BIOS, you’re laying the foundation for seamless virtual machine performance on Hyper-V. With this essential feature activated, you’re ready to move on to the next steps of installing and configuring Hyper-V to run Ubuntu effortlessly.
STEP 2: Enable Hyper-V
With virtualization support enabled in your BIOS, you’re ready to unlock the full potential of Hyper-V and bring Ubuntu to life within your Windows environment. Enabling Hyper-V is a straightforward process that transforms your system into a powerful virtualization platform.
To begin, navigate to the “Turn Windows attributes on or off” menu within the Control Panel. Here, you’ll find a list of optional features that you can on or off. Scroll via the list unless you find “Hyper-V,” indicated by its distinct icon. Check the box adjacent to it to switch on the feature, and then click “OK” to confirm your selection.


Windows may prompt you to restart your computer to implement the modifications. Be assured to save any work you have wired upon and proceed with the restart to activate Hyper-V fully. Once your system has rebooted, Hyper-V will be ready to use, allowing you to create and manage virtual machines with ease.

Enabling Hyper-V opens the door to a world of possibilities, empowering you to run Ubuntu alongside your Windows operating system seamlessly. Whether you’re a developer, IT professional, or simply curious about exploring different operating environments, Hyper-V provides the flexibility and performance you need to succeed.
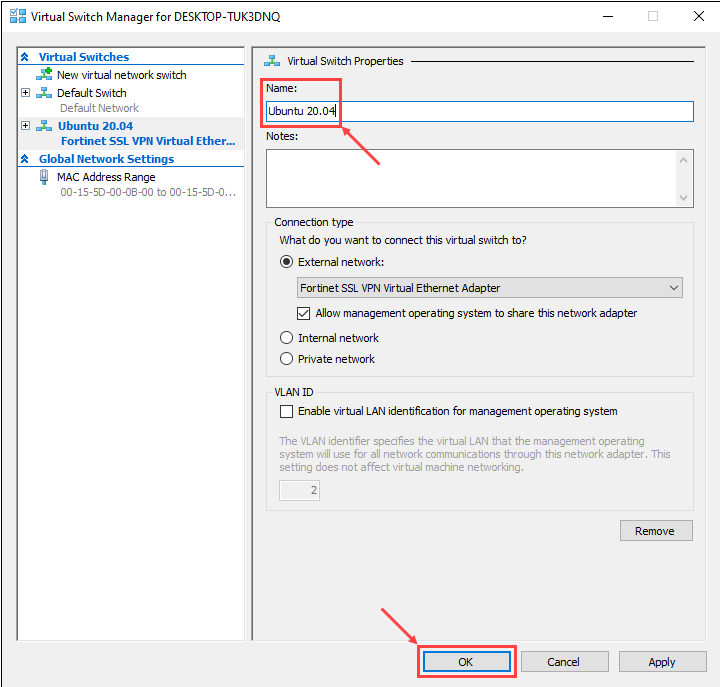
STEP 3: Create a Virtual Switch
Now that Hyper-V is enabled, it’s time to set up a virtual switch to establish communication between your Ubuntu virtual machine and the external network. This step is crucial for enabling network connectivity within your virtual environment.
To begin, open Hyper-V Manager, the central hub for managing your virtual machines and network settings. From the menu, navigate to the Virtual Switch Manager, where you’ll find options for creating and configuring virtual switches.

Once in the Virtual Switch Manager, select the choice to construct a new virtual switch. You’ll be presented with different types of virtual switches, incorporating External, Internal, and Private. For internet connectivity and communication with external networks, choose the “External” option.

Next, you’ll need to select the network adapter that will be associated with your virtual switch. This adapter should correspond to the physical network adapter of your host machine to ensure seamless connectivity.
After selecting the appropriate network adapter, follow the on-screen prompts to complete the creation of your external virtual switch. Be sure to give it a descriptive name to readily recognize it in the future.
With the virtual switch created, your Ubuntu virtual machine will be able to access the external network and communicate with other devices. This connectivity is essential for tasks such as software updates, web browsing, and network-based applications.

By setting up a virtual switch in Hyper-V, you’re laying the foundation for a fully functional Ubuntu environment within your Windows operating system. With network connectivity established, you’re now ready to proceed with the installation of Ubuntu on Hyper-V and explore its vast array of features and capabilities.
STEP 4: Install Ubuntu 20.04
Now that you’ve set up the groundwork, it’s time to dive into installing Ubuntu on Hyper-V. There are two simplest ways to pick from: Quick Create or Manual Installation.
Quick Create:
If simplicity is your preference, then Hyper-V’s Quick Create feature will be your best friend. Open up Hyper-V Manager, locate the “Quick Create” option, and give it a click. From there, select Ubuntu 20.04 from the list of available options, and let Hyper-V work its magic. Follow the prompts that appear on your screen, and in no time, you’ll have Ubuntu up and running on your Hyper-V environment.

Manually:
For those who like to have more control over the installation process, manual installation is the way to go. Start by downloading the Ubuntu 20.04 ISO from the official website. Then, within Hyper-V Manager, create a new virtual machine and configure its settings to your liking. Once that’s done, mount the Ubuntu ISO to the virtual machine and boot it up. From there, you’ll be guided through the Ubuntu installation process, allowing you to customize settings such as language, timezone, and disk partitioning to suit your needs.

Whether you opt for the Quick Create method or prefer the hands-on approach of manual installation, you’ll soon have Ubuntu 20.04 up and running smoothly on your Hyper-V setup. With Ubuntu at your fingertips, you’ll gain access to a vast ecosystem of open-source software and tools, empowering you to tackle any task with confidence.
STEP 5: Start the Virtual Machine
You’ve successfully installed Ubuntu on the Hyper-V environment. Now it’s time to fire up the virtual machine and explore all that Ubuntu has to offer within the Hyper-V ecosystem.
To start your Ubuntu virtual machine, simply open Hyper-V Manager and locate the virtual machine you just installed. You’ll see options to begin, pause, reset, or shut down the virtual machine. Click on the “Start” button to power up your Ubuntu VM.

As the virtual machine boots up, you’ll see the familiar Ubuntu loading screen, indicating that your operating system is initializing. Once Ubuntu has fully booted, you’ll be greeted by the desktop environment, ready for you to dive in and start using your virtual Ubuntu system.
Within the Hyper-V environment, you’ll have full access to Ubuntu’s features and functionalities, allowing you to run applications, browse the web, and perform various tasks just like you would on a physical Ubuntu machine.
Whether you’re using Ubuntu for development, testing, or general use, Hyper-V provides a stable and efficient platform for running Ubuntu alongside your Windows operating system. With Ubuntu at your fingertips, you can harness the power of open-source software while enjoying the convenience of virtualization provided by Hyper-V.
So go ahead, start your Ubuntu virtual machine on Hyper-V, and unlock a world of possibilities for productivity, creativity, and exploration. Happy computing!
Also Read: Ubuntu LTS Desktop Installation Steps {In Detail}
Conclusion
Congratulations! You’ve successfully installed Ubuntu on Hyper-V, unlocking a world of possibilities for development, testing, and experimentation. By following the steps outlined in this guide, you can seamlessly integrate Ubuntu into your Windows workflow and enjoy the best of both worlds. Whether you’re a developer, sysadmin, or enthusiast, Hyper-V provides a robust platform for running Ubuntu and other virtual machines with ease. Happy virtualizing!


