
Introduction
So, you’ve got your Ubuntu system set up and running smoothly, but now you want to enable SSH for remote access. SSH, or Secure Shell, is a resilient tool that permits you to securely connect to your Ubuntu machine from another device over a network. It does not matter if you are managing servers or just want to access your files remotely, enabling SSH on Ubuntu is a straightforward process. Let’s walk through the steps together.
Checking if SSH is installed on Ubuntu
Before you start enabling SSH, it is a great idea to verify if it is already installed on your Ubuntu system. You can do this by opening a terminal window and typing:
ssh -VThis command will show the version of SSH installed on your system, if any. If SSH is installed, you will get the version number. If not, you will acquire an error message saying that SSH is not found.
Configuring Firewall Settings for SSH Access
When it comes to enabling SSH access from remote devices on your Ubuntu system, assuring that your firewall settings are aptly configured is critical for seamless connectivity. Thankfully, Ubuntu simplifies this process with its built-in firewall, UFW (Uncomplicated Firewall), which may already be enabled on your system.
To grant SSH access through the firewall, you can execute the following command in your terminal:
sudo ufw allow ssh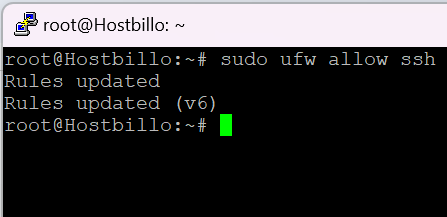
This command acts as a gateway, permitting incoming SSH connections through the firewall on the default SSH port (22). However, if you’ve opted to customize your SSH configuration and utilize a different port for enhanced security, remember to specify the port number within the command.
By allowing SSH traffic through your firewall, you’re essentially enabling your Ubuntu system to communicate securely with remote devices, thereby facilitating tasks such as remote administration, file transfers, and more. This step is fundamental in the process of configuring SSH on your Ubuntu machine, ensuring that external connections are both secure and accessible.
Enable SSH on Ubuntu
Once you’ve ensured that SSH is installed and configured your firewall settings to allow SSH connections, the next step is to enable SSH on your Ubuntu system. This process involves installing the SSH server package, which is essential for facilitating incoming SSH connections.
To begin the installation procedure, open a terminal window and implement the following commands:
sudo apt update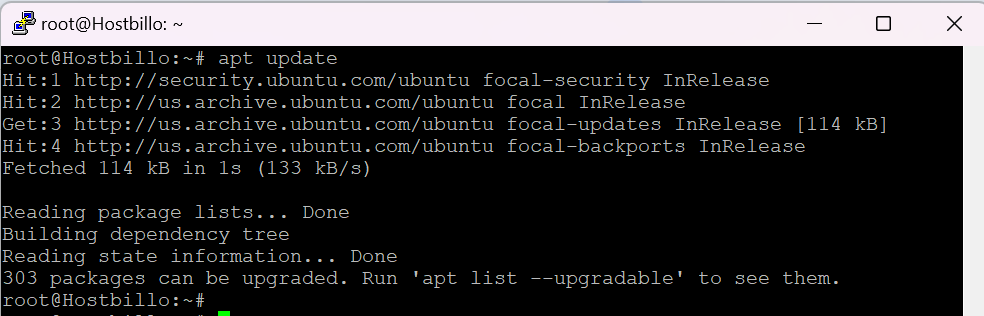
sudo apt install openssh-server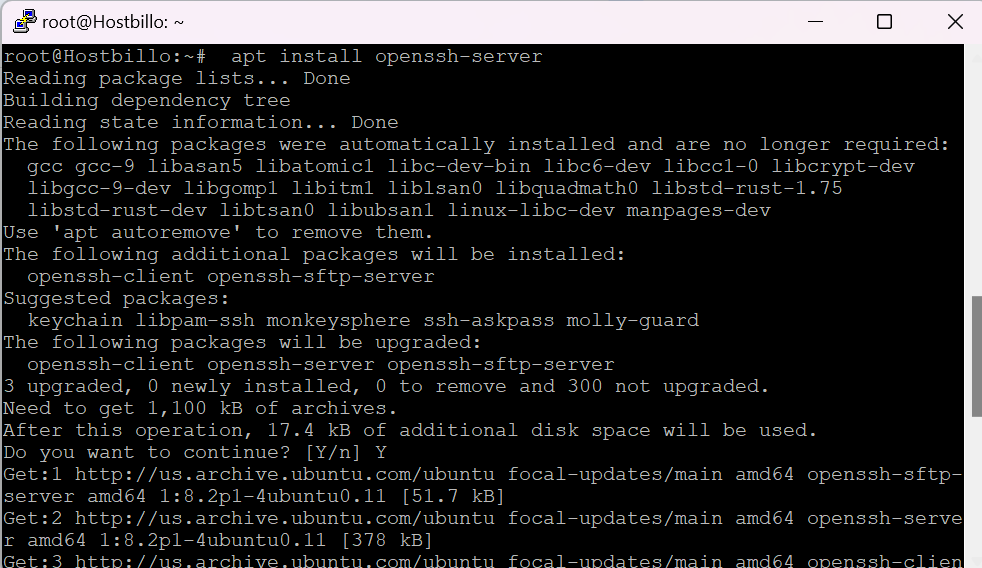
The first command, sudo apt update, updates the package list on your Ubuntu system, ensuring that you possess accessibility to the latest versions of software packages. Following this, the second command, sudo apt install OpenSSH-server, initiates the installation of the OpenSSH server package.
By installing the OpenSSH server, you’re essentially equipping your Ubuntu system with the necessary tools to accept incoming SSH connections securely. This step is pivotal for enabling remote access to your Ubuntu machine, allowing you to manage and interact with it from any location with an internet connection.
Log Into Remote Server With SSH
Once SSH is enabled on your Ubuntu system, you can seamlessly establish remote connections to it from any other device within your network or even over the internet. This capacity proves invaluable for activities like system administration, file transfers, and remote troubleshooting.
To initiate a remote SSH session, simply open a terminal window on the device you wish to connect from and execute the following command:
ssh username@hostnameHere, “username” refers to your username on the Ubuntu system you’re connecting to, while “hostname” can be either the IP address or the domain name of the Ubuntu system. This command prompts the SSH client to establish a secure connection to the specified host, allowing you to remotely access the Ubuntu system’s command-line interface.
By leveraging SSH for remote access, you gain the ability to manage your Ubuntu system from virtually anywhere, empowering you to execute commands, transfer files, and troubleshoot issues with unparalleled convenience and security.
SSH Configuration Options
With SSH successfully enabled on your Ubuntu system, it’s time to delve into the plethora of configuration options available to fine-tune your SSH setup and bolster security.
Edit Configuration File
One of the most powerful customization options lies within the SSH server configuration file, specifically situated at /etc/ssh/sshd_config. This file serves as the central hub for configuring various aspects of your SSH server, allowing you to tailor its behavior to your specific requirements. Within this file, you can tweak settings such as the default port used for SSH connections, specify allowed authentication methods, restrict access to specific users or groups, and much more. By judiciously modifying this configuration file, you can optimize your SSH server for performance, security, and ease of use, ensuring a seamless remote access experience.
Disable Root
Security-conscious users often opt to disable direct root login via SSH as a proactive measure against unauthorized access attempts. This can be obtained by setting the PermitRootLogin directive to no within the SSH configuration file. By disallowing direct root access, you mitigate the risk of brute-force attacks and unauthorized privilege escalation attempts, thereby fortifying the overall security posture of your Ubuntu system. Instead, users are encouraged to employ regular user accounts for SSH access and utilize the sudo command when administrative privileges are required, adhering to the principle of least privilege and minimizing the potential impact of security breaches.
Configure Firewall
In addition to SSH-specific configuration tweaks, it’s imperative to ensure that your firewall settings are aligned with your SSH requirements. While Ubuntu ships with UFW (Uncomplicated Firewall) as its default firewall management tool, you may be utilizing an alternative firewall solution or have custom firewall rules in place. Regardless of the firewall tool you use, it’s essential to configure it to allow SSH traffic on the desired port(s). This involves opening the appropriate port(s) for incoming SSH connections and ensuring that any relevant firewall rules are correctly configured to permit SSH traffic. By meticulously configuring your firewall settings, you safeguard against inadvertent access restrictions and ensure seamless connectivity for SSH clients attempting to connect to your Ubuntu system.
How to Disable SSH on Ubuntu?

If, for any reason, you want to disable SSH access on your Ubuntu system, you can do so by stopping the SSH service. In the terminal, type:
sudo systemctl stop ssh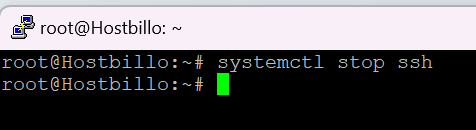
This command will stop the SSH service immediately. If you want to disable SSH permanently, you can also use:
sudo systemctl disable ssh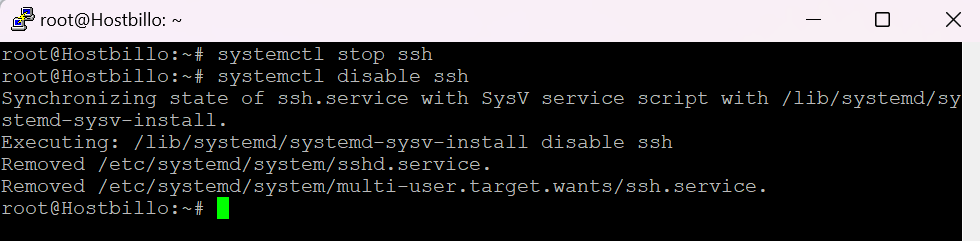
Also Read: How to Install Ubuntu on Hyper-V?
Conclusion
Enabling SSH on Ubuntu opens up a globe of opportunities for remote access and management of your system. By following the steps highlighted above, you can securely configure SSH on your Ubuntu machine, permitting you to sync to it from anywhere with ease. It does not matter if you are a system administrator or just an Ubuntu enthusiast, SSH is a must-have tool in your arsenal.


