
Introduction
In the world of software development, managing versions and tracking changes efficiently is crucial. Git, a popular version control system, offers a robust feature called tagging to help with this. Tags are used to mark specific points in your repository’s history, often to denote release versions or significant milestones. In this tutorial, you will learn how to create a tag in Git, including both annotated and lightweight tags, and how to manage them effectively. Whether you’re working locally or collaborating on GitHub, understanding tagging in Git can enhance your workflow and version control practices.
What Are Tags in Git?
Tags in Git are references that point to specific commits in your repository’s history. They serve as markers for particular points in your development process, such as version releases or significant updates. Unlike branches, which are mutable, tags are immutable once created. This immutability ensures that tags represent a fixed point in time, making them ideal for versioning releases.
There are two main types of tags in Git:
- Annotated Tags: These are stored as full objects in the Git database. They include metadata such as the tagger’s name, email, date, and a tagging message. Annotated tags are recommended for most cases as they provide detailed information and are more permanent.
- Lightweight Tags: These are simply pointers to a specific commit. They do not include metadata or messages, making them more suitable for quick, temporary tags.
How to Create a Tag in Git?
Creating tags in Git is straightforward and can be done via the command line. Here’s a step-by-step guide on how to create a tag:
- Open your terminal and navigate to your Git repository using cd path/to/your/repository.
- Choose the commit you want to tag. If you want to tag the latest commit, you can use HEAD.
- Use the Git tag command to create your tag. Depending on whether you want an annotated or lightweight tag, the command will vary.
Creating an Annotated Tag
Annotated tags are comprehensive and include metadata. To create an annotated tag, use the following command:
git tag -a <tag_name> -m “Tag message”

For example, to tag a version as v1.0.0 with a message “Initial release”, you would use:
git tag -a v1.0.0 -m “Initial release”
To view the tag details, including the message and the tagger’s information, you can use:
git show <tag_name>
Creating a Lightweight Tag
Lightweight tags are simpler and do not include additional metadata. To create a lightweight tag, use the following command:
git tag <tag_name>

For instance, to create a tag called v1.0.0, you would use:
git tag v1.0.0
This creates a reference to the current commit without any extra information.
Create Git Tag For a Commit
If you want to tag a specific commit rather than the latest one, you need to include the commit hash in your tag command. For example:
git tag -a <tag_name> <commit_hash> -m “Tag message”
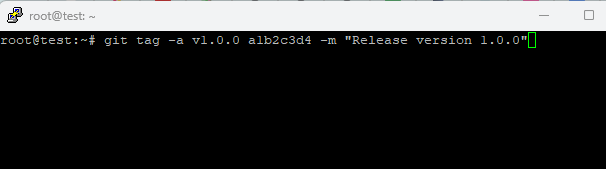
To tag a commit with the hash a1b2c3d4 as v1.0.0, use:
git tag -a v1.0.0 a1b2c3d4 -m “Release version 1.0.0”
Push Tags to Remote Repository
By default, tags are not pushed to your remote repository when you run git push. To push tags to a remote repository, use:
git push origin <tag_name>

If you want to push all tags at once, you can use:
git push –tags

This will ensure that all your tags are synchronized with the remote repository on GitHub or any other Git hosting service.
How to View Tags in Git?
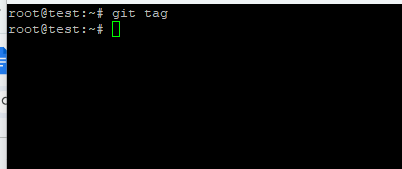
To see a list of all tags in your repository, use:
git tag
For more detailed information about each tag, including the commit they point to, you can use:
git tag -n
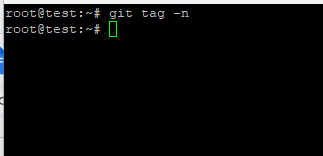
If you want to see the tags along with their associated commit messages, this command will be particularly useful.
Also Read: How to Update Git on Windows, Mac, and Linux?
Conclusion
Tagging is a powerful feature in Git that helps you manage and identify key points in your repository’s history. By learning how to create a tag and manage it effectively, you can better organize your codebase and facilitate smoother releases and versioning. Whether you choose annotated tags for their detailed metadata or lightweight tags for simplicity, knowing how to leverage these tools will enhance your development workflow. Embrace creating tags in Git and take full control of your project’s version history.


