
Introduction
In the world of version control, managing changes and maintaining a clean working directory is crucial. When you’re working with Git, you may find yourself in a situation where you need to switch contexts, but you don’t want to commit your current changes just yet. This is where the git stash command becomes incredibly useful. It allows you to temporarily save your uncommitted changes, enabling you to work on something else without losing your progress. In this article, we’ll delve into what Git stash is, how it differs from Git commits, why it’s necessary, and provide you with a comprehensive guide on how to use it effectively.
What is Git stash?
Git stash is a command that allows you to save your current working directory and index state temporarily. When you execute git stash, Git creates a new stash entry that stores your modifications. This is particularly useful when you need to switch branches or pull updates from a remote repository but aren’t ready to commit your changes yet. Essentially, git stash lets you shelve your changes to come back to them later, without committing them to your repository.
How to Stash Git: To stash your changes, you simply run:
git stashThis command saves both staged and unstaged changes, effectively cleaning your working directory. If you want to stash only specific changes, you can use advanced options like git stash push with -p (patch mode).
Git stash vs Git Commit
Understanding the difference between git stash and git commit is crucial for effective version control and managing your development workflow. Each serves a distinct purpose and is used in different scenarios to help maintain a clean and organized codebase.
Git Commit:
- Purpose: The git commit command is used to save changes to your local repository. This command captures a snapshot of the current state of your project and stores it permanently in your repository’s history. Commits are essential for tracking the progress and evolution of your codebase, allowing you to document changes with descriptive messages. Each commit is identified by a unique hash and is a permanent record in the repository.
- Usage: When you make a commit, you are creating a lasting entry in your project’s history. This is ideal for significant changes, features, or fixes that are ready to be part of the project’s development. Commits are used to track development progress, review code changes, and roll back to previous states if necessary.
- Example: Suppose you’ve finished implementing a new feature and want to save your work. You would use git commit to create a permanent record of this feature, ensuring it is included in the project’s history with a message describing what was done.
Git Stash:
- Purpose: Git stash is a temporary storage solution that saves your uncommitted changes into a stack-like structure. Unlike git commit, stashing does not create permanent records in the repository. Instead, it allows you to set aside your current work without committing it, so you can switch contexts or handle other tasks. This is useful for scenarios where you need to pause your current work and return to it later without making a permanent change to the repository’s history.
- Usage: You use git stash when you need to temporarily save your modifications but do not want to commit them immediately. It’s an ideal tool for situations where you need to switch branches or handle urgent issues but plan to come back to your saved changes. Git stash helps maintain a clean working directory without leaving intermediate commits in your history.
- Example: Imagine you’re working on a new feature but suddenly need to switch to a different branch to fix a critical bug. Instead of committing incomplete code, you can use git stash to save your ongoing work temporarily. Once the bug fix is complete, you can return to your feature branch and reapply your git stashed changes.
Git Stashed Changes vs. Committed Changes:
- Git Stashed Changes: When you use git stash, you save your changes in a temporary stack. These changes are not part of the repository’s history and can be reapplied later using commands like git stash apply or git stash pop. This is useful for temporarily setting aside work without creating permanent records.
- Committed Changes: In contrast, git commit creates a permanent record of your changes in the repository’s history. Each commit represents a snapshot of your code at a specific point in time, which is useful for tracking progress and collaborating with others. Commits are essential for maintaining a detailed history of your project’s development.
Why do we need Git stash?
Using git stash is a powerful way to manage uncommitted changes and maintain a clean working directory. Here are several key scenarios where git stash becomes indispensable:
- Context Switching: When working on a project, you might need to quickly switch branches to address an urgent issue or pull updates from a remote repository. Without git stash, you would either need to commit your current changes or lose them. By using git stash, you can temporarily save your current work-in-progress without committing it. This feature allows you to return to your git stashed changes later, ensuring that you can handle urgent tasks or updates without losing your place. For instance, if you’re working on a feature branch but need to fix a critical bug in the main branch, git stash enables you to save your current state and seamlessly switch branches.
- Incomplete Features: While developing new features, there are times when your work is not yet ready to be committed. In such cases, you may need to pull the latest changes from the remote repository or integrate updates without committing your incomplete work. Git stash helps you keep your working directory clean and free from uncommitted changes, making it easier to fetch updates or switch contexts. This is particularly useful when your current changes are not final or when you need to temporarily set them aside. By using git stash, you ensure that your working directory remains clean and that you can fetch updates or integrate changes smoothly.
- Resolving Merge Conflicts: During a merge or rebase operation, conflicts can arise that require manual resolution. If you have uncommitted changes that might complicate the process, git stash can be used to temporarily set aside your modifications. This allows you to address the conflicts more effectively without your local changes interfering. After resolving the conflicts and completing the merge or rebase, you can reapply your stashed changes. This use of git stash helps ensure a smoother conflict resolution process and keeps your work organized.
- Switching Contexts for Code Reviews: If you need to review or work on different parts of a codebase while your current changes are not yet ready for a commit, git stash lets you temporarily set aside your work. This is especially useful if you’re part of a team and need to switch between different tasks or code reviews frequently. By using git stash, you can cleanly transition between tasks without committing intermediate or incomplete work, allowing you to maintain focus and productivity.
Example Scenario: Imagine you’re developing a new feature, and suddenly a critical bug arises in the main branch that needs immediate attention. Instead of committing incomplete code or abandoning your feature work, you can use git stash to save your ongoing work. This allows you to switch to the main branch, address the bug, and then return to your feature branch and reapply your git stashed changes. This approach keeps your changes organized and ensures that you can seamlessly switch contexts without losing progress.
How Does Git Stash Work?
When you run the git stash command, Git performs a series of actions designed to temporarily save and manage your uncommitted changes. Here’s a detailed look at how git stash works and what each step involves:
- Save Changes: The first action of git stash is to save your modifications into a new stash entry. This includes both staged and unstaged changes in your working directory. Essentially, git stash creates a snapshot of your current state, preserving your git stashed modifications in a temporary storage area. The command captures the changes made to tracked files and saves them in a stack-like structure, which you can later retrieve or apply as needed. This temporary saving of modifications is crucial for maintaining a clean working state while you perform other tasks or switch contexts.
- Clean Working Directory: After saving your changes, git stash reverts your working directory to match the last commit. This means that any uncommitted changes—whether they were staged or not—are removed from your working directory. This action effectively cleans your working directory, allowing you to start fresh without losing your progress. The cleaned state is essentially a snapshot of your last committed state, providing a clear environment for new tasks or branches.
- Store Stash: The stashed changes are stored in a stack-like structure, accessible via the git stash list command. This stack is referred to as the stash stack or stash list. Each stash entry is identified by a unique reference (e.g., stash@{0} for the most recent stash). You can view all stashes in this stack and manage them as needed. The git stash list command provides an overview of your stashes, showing their reference numbers and associated messages if any were provided during stashing.
Also Read: How to Create a Tag in Git? | Tutorial
A step-by-step guide to using Git stash
Here’s a detailed guide on how to effectively use git stash:
Create a Git Stash
To stash your current changes, run:
git stashThis command saves your changes and cleans your working directory.
Create a Partial Stash
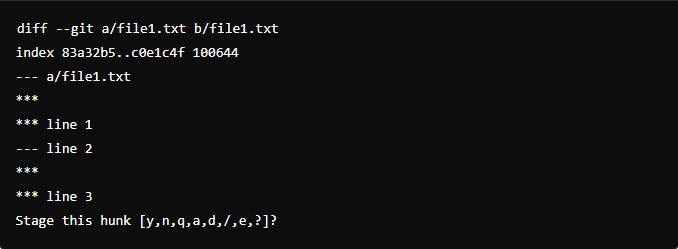
If you want to stash only specific changes, use:
git stash push -pThis will allow you to interactively select which changes to stash.

List the Git Stash Entries
To view your stash entries, use:
git stash listThis command displays all stashes in a stack, showing the most recent one at the top.

Show the Stash Diffs
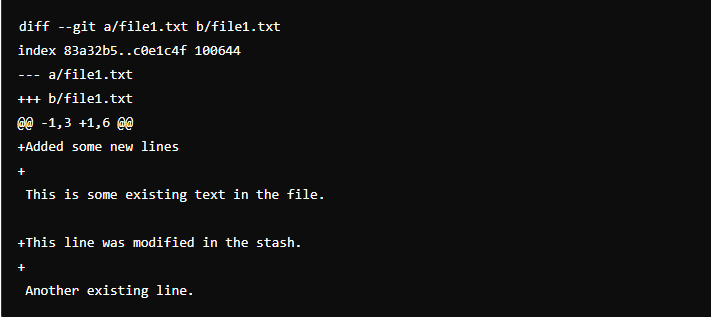
To see what changes are stored in a specific stash, run:
git stash show -p stash@{0}Replace stash@{0} with the appropriate stash reference.
Checkout to a New Branch
You can apply a stash and switch to a new branch in one go with:
git checkout -b new-branch-namegit stash applyThis creates a new branch and applies your stashed changes to it.

Create Stash Without Reference
To create a stash without any reference (i.e., without a message or specific context), just use:
git stashYou can later identify it using git stash list.
Clear Git Stash History
To remove all stashes, use:
git stash clearThis command deletes all stash entries from your stack.
Conclusion
Git stash is an essential tool for managing uncommitted changes when you need to switch contexts or perform other tasks. Understanding how to use it effectively—whether you’re creating, listing, or applying stashes—can greatly enhance your workflow. By leveraging git stash, you ensure that your working directory remains clean and that you can seamlessly return to your previous state whenever needed. Now that you know how to use git stash and its various commands, you can integrate it into your Git workflow to better manage your changes and improve your productivity.


